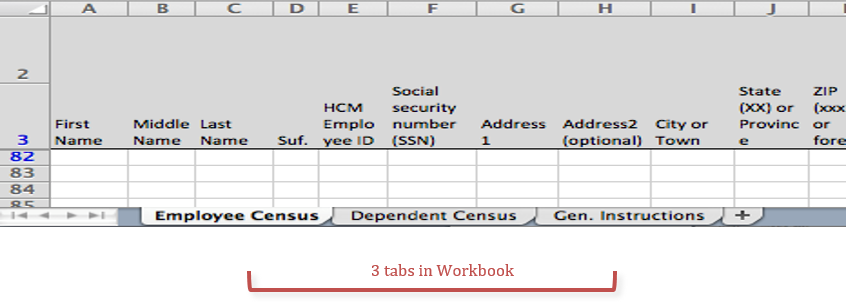
Employee data can be copied from your Payroll, HR, or other systems, and pasted into the Workbook. Every W2 employee that worked for your organization during 2016 must be included in the Census.
If you were self-funded at any time during 2016, any non-employee (ex: Cobra/Retiree) who received coverage must also be listed on the Census.
Demographic Data (Columns A – M)
- Enter the employee’s legal name on file with Social Security
- Legal characters = A-Z, a-z, and single space
- Illegal characters = leading space, trailing space, adjacent space, numbers, symbols
- Leave column E blank
- Enter employee address and SSN from the W-2
- City cannot contain a number
- US state is the 2-digit abbreviation for the state
- Use the 5-digit zip code in column K and a separate 4-digit zip code in column L
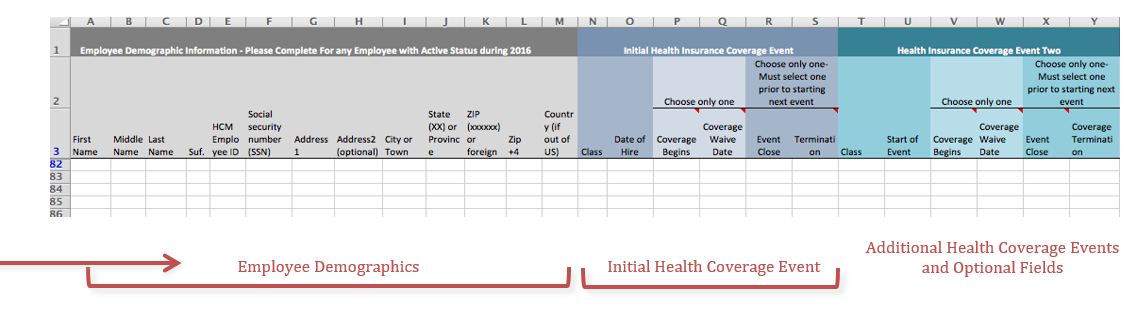
Initial Health Coverage Event Data (Columns N-S)
-
- Enter the employee’s Class number. This class # will be available on the Print Groups and Classes Report Download
- Enter Date of Hire (DOH)
- Enter either the date health coverage became effective or the date coverage was waived when the employee first became eligible for coverage for full -time and part -time eligible classes.
- Employees who are not eligible for coverage on any day in 2016 belong in the non-eligible class and will not receive a 1095-C. For these employees, only include date of hire (DOH) and class.
- Enter coverage effective date for Cobra classes
- Non eligible employee classes and MEIRR just enter date of hire and date of termination
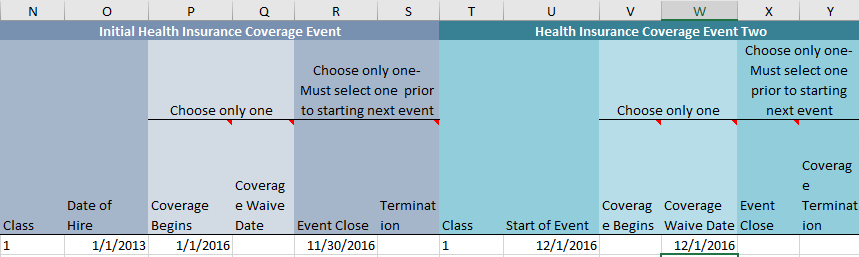
Coverage Changes and Terminations
Employee coverage status can change during the course of the year, for a variety of reasons. HCM File allows up to 11 addition changes throughout the year through the color-coded health events columns. Within the Health Event sections you can manage change from full time to part time, covered to waived status, cobra and class changes. Here’s how to handle those changes using the second Health Event for the change. Equivalent changes would apply in Health Events 3-12:
To changes classes This applies to moving to a new employee class as well as going on Cobra/Retiree coverage.
- Close of eventin column R
- Assign Class Number in Column T
- Start a new event with date inc olumn U
- Indicate date of new event in column V.
To terminate Coverage This applies to both full time and part time employees who terminate
- enter termination date in column S.
For covered employees who subsequently waive coverage
- Close of event in column R
- Assign Class Number in Column T
- Start a new event with date in column U
- Indicate date of new event in column W.
For waived employees who subsequently take coverage
- Close of event in column R
- Assign Class Number in Column T
- Start a new event with date in column U
- Indicate date of new event in column V.
For employees who are rehired
- Terminate them from coverage in column S
- Assign Class Number in Column T
- Start a new event with date in column U
- Indicate date of new event in column V.
For seasonal workers who go on/off coverage during the year, create new Coverage Events for each instance. Repeat the process above for entering data in columns T-CG. You can create as many as 11 additional Events per year starting in column T, but you must end the former Event (with either an Event Close date or a Termination date), in order to create a new Event.
For Employees who change FEIN– Do not use the change process, but instead terminate the employee and start a new row. To change EINs indicate termination date in column S, thenstart a new row in the workbook as a new hire.
Example –For coverage employee who subsequently waives coverage